左手's Blog
我是左手,行走在路上!
使用acmd构建jade/sass/livescript开发环境
之前写过一个browserSync的脚本编译jade/sass/coffee,在多个项目中拷贝脚本文件比较麻烦,业余封装了一个npm插件,这里介绍一下用法。
项目地址:https://github.com/thinkjs/autocommand-cli,插件使用typescript开发,欢迎有兴趣的同学一起完善。
环境搭建
1.创建目录
mkdir example && cd example
mkdir _source _source/jade _source/sass _source/live
mkdir html html/css html/js
_source目录存放源代码,_source/jade、_source/sass、_source/live分别存放jade、sass、livescript源文件。html目录存放生成结果,html、html/css、html/js分别存放html、css、js文件。
2.安装npm包依赖
echo '{}' > package.json
npm install thinkjs/autocommand-cli#latest jade node-sass livescript --save-dev
如果网络不好,建议使用cnpm替代
3.编辑package.json加以下内容:
"scripts": {
  "acmd": "acmd",
  "start": "acmd watch",
  "build": "acmd run"
},
完整的package.json如下
{
  "scripts": {
    "acmd": "acmd",
    "start": "acmd watch",
    "build": "acmd run"
  },
  "devDependencies": {
    "autocommand-cli": "thinkjs/autocommand-cli#latest",
    "jade": "^1.11.0",
    "livescript": "^1.5.0",
    "node-sass": "^3.9.3"
  }
}
4.创建acmd配置文件并修改
npm run acmd -- config -i
默认在当前目录下创建名为_config的配置文件,编辑该配置文件
修改file字段内容为:
"file": ["_source/**/*.{jade,sass,ls}"],
修改define字段内容为:
"define": {
  "_source/": {
    ".jade": {
      "file": "html/#{fileName}.html",
      "command": "jade -Po html/ #{file}"
    },
    ".sass": {
      "file": "html/css/#{fileName}.css",
      "command": "node-sass --output-style compact #{file} html/css/#{fileName}.css"
    },
    ".ls": {
      "file": "html/js/#{fileName}.js",
      "command": "lsc -co html/js/ #{file}"
    }
  }
},
修改 browserSync > init下的server为:
"server": {
  "baseDir": "html/"
},
完整配置文件如下:
{
  // 侦听的文件
  "file": ["_source/**/*.{jade,sass,ls}"],
  // 过滤
  "ignore": ["_*.*", "node_modules/"],
  // 变量
  "variable": {
    "localBin": "~/node_modules/.bin"
  },
  // 环境变量
  "environment": {
    ":PATH": "#{localBin}"
  },
  // 定义
  "define": {
    "_source/": {
      ".jade": {
        "file": "html/#{fileName}.html",
        "command": "jade -Po html/ #{file}"
      },
      ".sass": {
        "file": "html/css/#{fileName}.css",
        "command": "node-sass --output-style compact #{file} html/css/#{fileName}.css"
      },
      ".ls": {
        "file": "html/js/#{fileName}.js",
        "command": "lsc -co html/js/ #{file}"
      }
    }
  },
  // browserSync配置
  "browserSync": {
    // 初始化配置
    "init": {
      "server": {
        "baseDir": "html/"
      },
      "open": false,
      "ui": false
    },
    // 启动livereload
    "reload": true
  }
}
// vim: se sw=2 ts=2 sts=2 ft=javascript et:
开发
1.编译jade文件
创建_source/jade/index.jade,内容如下:
doctype html
html
  head
    title jade page
  body
    h1 hello world
在terminal中运行 npm start,浏览器访问 http://localhost:3000,可查看页面。
2.编译sass文件
创建_source/sass/style.sass,内容如下:
html, body
  padding: 0
  margin: 0
  font-size: 16px

h1
  color: green
编辑_source/jade/index.jade加入对style.sass的引用,在head中插入以下内容:
link(href="css/style.css" rel="stylesheet")
保存查看浏览器,内容已自动刷新。
3.编译livescript文件
创建_source/sass/script.ls,内容如下:
console.log \hello
编辑_source/jade/index.jade加入对script.ls的引用,在body中插下以下内容:
script(src="js/index.js")
保存可查看浏览器中的控制台输出。
进阶用法
1.编译所有文件
有时需要对项目的所有源文件进行编译,使用如下命令:
npm run build
2.编译某一类型文件
比如需要编译所有的sass文件,可以使用如下命令:
npm run build -- -f _source/sass/*.sass
3.使用glob表达式匹配文件
-f选项支持glob表达式,使用引号括起即可,例如编译jade和sass可以使用如下命令:
npm run build -- -f '_source/**/*.{jade,sass}'
4.使用通道
如果使用git管理文件,需要编译git中已经修改的文件,可以使用如下命令:
git status -uno | awk '{print $2}' | npm run build -- -o
使用find查找sass进行编译,命令如下:
find _source -type f | grep *.sass | npm run build -- -o
小结
autocommand-cli项目最初的出发点是为了锻炼一下typescript的能力,经过半年的迭代,功能已经逐渐完善。命令行参数解析、文件改动侦听、http服务器功能都使用现成npm插件实现。前端的工具链不断完善,各种工具层出不穷,花大量时间造一个自己用起来的顺手的工具还是有点奢侈:)
使用JS重写API拦截运营商广告
近期公司站点通过联通4G网站访问时被运营商插入广告代码,通过手机抓包定位到运营商值入的广告代码。
植入的广告代码通过在固定url的请求中添加内容插行一段js,通过body.appendChild在页面引入一段js代码。想到一个应急方案,通过改写appendChild来拦截广告,经测试有效。代码如下:
(function() {
var rootEl = top.document.body;
var originAppendChild = rootEl.appendChild;
try {
    rootEl.appendChild = function (elem) {
    var src = '';
    if (typeof elem == 'object' && elem != null && elem.getAttribute) {
        src = elem.getAttribute('src');
    }
    if (typeof src == 'string' && src.length) {
        if ( src.match(/^(?:http(?:s)?:)?\/\/\d{1,3}\.\d{1,3}\.\d{1,3}\.\d{1,3}/)
            || src.match(/cifenqi\.com/) != null) {
        return;
        }
    }
    originAppendChild.apply(rootEl, [].slice.call(arguments, 0));
    }
}
catch(e) { }
})();
ISP广告干的是非法勾当多使用ip地址,因此直接屏蔽ip地址的元素。此方法只能应急可被绕过,难怪某度、某宝纷纷启用全站https。
基于browser-sync的前端预处理器工作流
之前使用预处理器一直是基于vim插件autocommand,最近和同事协作开发,vim入门太陡峭,抽了点时间用browser-sync实现了类似功能。具体功能如下:自动检测jade、sass、livescript等源码文件的改动,编译对应的html、css、js,更新改动到浏览器中打开的页面。
明确几个定义:
1. browser-sync nodejs插件,官方说明 Time-saving synchronised browser testing。
2. 前端预处理器 jade、sass、livescript。
3. 工作流 使用browser-sync整合jade、sass、livescript完成开发的一套流程。
依赖:
nodejs
npm package: jade、livescript、browser-sync
ruby
gem package: sass
工作目录:
说明:_source目录下存放预处理器源代码,html目录存放生成的html、css、js等。
在workspace目录下创建 browserSync.ls 具体代码如下:
path = require \path
exec = require \child_process .exec
browserSync = require \browser-sync .create!

# config {{{
outputDir = 'html'
cssOutputDir = "#outputDir/css"
jsOutputDir = "#outputDir/js"

reloadWatchFile = ''
  # "#outputDir/*.html"
  # "#jsOutputDir/*.js"
  # "#outputDir/img/*.*"

compileWatchFile =
  "_source/jade/*.jade"
  "_source/sass/*.sass"
  "_source/live/*.ls"

autoCompileFile = true
# }}}
# getTimeToken {{{
getTimeToken = ->
  currDate = new Date()
  hours = currDate.getHours()
  minutes = currDate.getMinutes()
  seconds = currDate.getSeconds()
  if hours < 10
    hours = "0#hours"
  if minutes < 10
    minutes = "0#minutes"
  if seconds < 10
    seconds = "0#seconds"
  "#hours:#minutes:#seconds"
# }}}
# compileTask {{{
getCompileCmdAndFileName = (file, ext) ->
  filename = path.basename file, ext

  switch ext
  case '.jade' then
    compileFileName = "#outputDir/#{filename}.html"
    cmd = "jade -Po #outputDir #file"
  case '.sass' then
    compileFileName = "#cssOutputDir/#{filename}.css"
    cmd = "sass --sourcemap=none --style compact #file|sed '/^@charset/d'>#compileFileName"
  case '.coffee' then
    compileFileName = "#jsOutputDir/#{filename}.js"
    cmd = "coffee --no-header -bco #jsOutputDir #file"
  case '.ls' then
    compileFileName = "#jsOutputDir/#{filename}.js"
    cmd = "lsc --no-header -bco #jsOutputDir #file"
  default
    compileFileName = cmd = ''
  [cmd, compileFileName]

compileTask = (file, ext, reload) !->
  cmdIndex = -1
  try
    [cmd, filename] = getCompileCmdAndFileName file, ext

  if not cmd or not filename
    console.log "cmd not define. file: #file ext: #ext"

  # exec callback
  execCallback = (err, stdo, stde) !->
    if err is null and not stde
      if cmdIndex is -1
        console.log "[#{getTimeToken!}] compiled #filename"
        reload filename if reload
      else
        execCmd()
    else
      console.log err || stde

  # execute command
  do execCmd = !->
    if Array.isArray cmd
      currCmd = cmd[++cmdIndex]
      if cmd.length <= cmdIndex+1
        ``cmdIndex = -1;``
    else
      currCmd = cmd

    if currCmd
      exec currCmd, execCallback

compileCallback = (file) !->
  ext = path.extname file
  filename = path.basename file

  # ignore partial file
  if filename.charAt(0) is '_'
    return undefined

  switch ext
  case '.jade', '.coffee', '.ls', '.sass'
    #   compileTask file, ext
    # case '.sass'
    compileTask file, ext, browserSync.reload
  default
    console.log 'unknown file type.'
# }}}
# browserSync {{{
browserSync.init do
  server:
    baseDir: outputDir
    index: \index.html
  open: false

if reloadWatchFile and reloadWatchFile.length
  browserSync.watch reloadWatchFile
  .on \change, browserSync.reload

wacher = browserSync.watch compileWatchFile
.on \change, compileCallback
# auto compile file
if autoCompileFile
  wacher.on \add, compileCallback
# }}}

# vim: set sw=2 ts=2 sts=2 et fdm=marker:
使用方法如下:
cd workspace
lsc browserSync.ls
* lsc 是 livescript的命令,使用npm 全局安装 livescript 后方可使用。
配置说明:
outputDir html文件的输出目录,web server的根目录。
cssOutputDir css文件输出目录。
jsOutputDir js文件输出目录。
reloadWatchFile 检测改动的目录,如果文件发生变更,会更新到打开的页面中。html/css/js已自动更新,默认可留空。
compileWatchFile 监测的源码文件,如果发生变化执行编译任务。
autoCompileFile 自动编译文件,设为true时,每次启动会把所有的源码文件编译一遍。
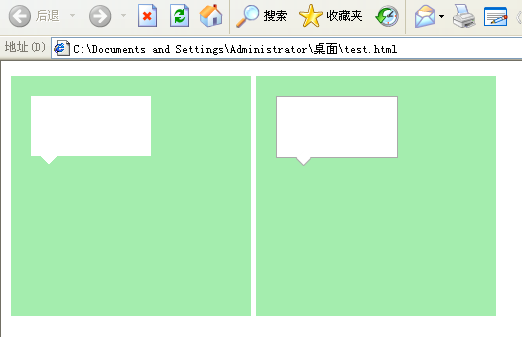
css画箭头的两种方式
前端开发的时候,悬停弹出层经常会有小箭头。分享两种常见箭头实现方式。
1. 用边框做类似
.arrow1 {
  width: 0;
  height: 0;
  overflow: hidden;
  zoom: 1;
  border: 8px solid transparent;
  border-top-color: #FFF;
}
将元素大小设为0,将边框色设为透明只设置其中一个边的颜色,即可实现一个三角形。
2. 用css旋转正方式,用来画有边框的三角形
.arrow2 {
  width: 10px;
  height: 10px;
  overflow:hidden;
  zoom: 1;
  position: absolute;
  border-right: 1px solid #AAA;
  border-bottom: 1px solid #AAA;
  transform: rotate(45deg);
  -o-transform: rotate(45deg);
  -moz-transform: rotate(45deg);
  -webkit-transform: rotate(45deg);
  background-color: #FFF;
}
通过css3旋转正方形,ie下可通过滤镜实现。需要注意的是如果当前系统安装的是ie9或ie10,通过模拟ie8来调试是看不到转滤镜的。
一个实例效果:
http://www.useragentman.com/IETransformsTranslator/ 一个在线转换的网址,用来生成IE旋转滤镜参数。
附实例代码:
<!DOCTYPE html>
<html><!--[if lte IE 8]><html class="ie ltie9"><![endif]--><!--[if gte IE 9]><html class="ie ie9"><![endif]-->
  <head>
    <meta charset="UTF-8">
    <title>css三角形</title>
    <style>
      .box1, .box2 {
        width: 200px;
        height: 200px;
        padding: 20px;
        float:left;
        margin-right: 5px;
        background-color: #a4edae;
        position: relative;
      }
      .square1 {
        background-color: #FFF;
        width: 120px;
        height: 60px;
        display: block;
      }
      .arrow1 {
        width: 0;
        height: 0;
        overflow: hidden;
        zoom: 1;
        border: 8px solid transparent;
        _border-color:tomato;
        _filter:chroma(color=tomato);
        border-top-color: #FFF;
        vertical-align: -7px;
        *vertical-align: 0;
        margin-left: 10px;
      }
      .square2 {
        background-color: #FFF;
        border: 1px solid #AAA;
        width: 120px;
        height: 60px;
        position: absolute;
        top: 20px;
        left: 20px;
      }
      .arrow2 { width: 10px; height: 10px; overflow:hidden; zoom: 1; position: absolute; top: 76px; left: 40px; border-right: 1px solid #AAA; border-bottom: 1px solid #AAA; transform: rotate(45deg); -o-transform: rotate(45deg); -moz-transform: rotate(45deg); -webkit-transform: rotate(45deg); background-color: #FFF; }
      .ltie9 .arrow2  { transform: rotate(0deg); top: 75px; filter: progid:DXImageTransform.Microsoft.Matrix(M11=0.7071067811865474, M12=-0.7071067811865477, M21=0.7071067811865477, M22=0.7071067811865474, SizingMethod='auto expand'); }
    </style>
  </head>
  <body>
    <div class="box1">
      <div class="square1"></div><i class="arrow1"></i>
    </div>
    <div class="box2">
      <div class="square2"></div><i class="arrow2"></i>
    </div>
  </body>
</html>
兼容ie6的fixed布局(非js、expression)
时代的脚本向前,ie6也快走出历史舞台了,只是现在还折腾着某些人(仰天长笑三声 哈!哈!哈!)。分享一个兼容fixed的小方法,传统的js侦听scroll事件以及expression的方法页面经常出现卡顿,用了一个取巧的方案来实现类似fixed的效果。直接上代码:
<!DOCTYPE html>
<html>
<!--[if lt IE 7]> <html class="ie6"> <![endif]-->
<!--[if IE 7]> <html class="ie7"> <![endif]-->
<!--[if IE 8]> <html class="ie8"> <![endif]-->
<!--[if gte IE 9]> <html class="ie9"> <![endif]-->
<head>
  <meta charset="UTF-8">
  <title></title>
  <style type="text/css">
    html, body {
      padding: 0;
      margin: 0;
    }
    .ie6, .ie6 body {
      height: 100%;
      overflow-y: hidden;
    }
    .ie6 .contentWrap {
      overflow-y: auto;
      width: 100%;
      height: 100%;
    }
    .popLayer {
      width: 400px;
      height: 400px;
      position: fixed;
      top: 50%;
      left: 50%;
      margin-top: -200px;
      margin-left: -200px;
      background-color: #F0F0F0;
      border: 1px solid #DDD;
    }
    .ie6 .popLayer {
      position: absolute;
    }
  </style>
</head>
<body>
  <!--[if lt IE 7]><div id="contentWrap" class="contentWrap"><![endif]-->
  <p>这是一行文字</p><p>这是一行文字</p><p>这是一行文字</p><p>这是一行文字</p><p>这是一行文字</p><p>这是一行文字</p><p>这是一行文字</p><p>这是一行文字</p><p>这是一行文字</p><p>这是一行文字</p><p>这是一行文字</p><p>这是一行文字</p><p>这是一行文字</p><p>这是一行文字</p><p>这是一行文字</p><p>这是一行文字</p><p>这是一行文字</p><p>这是一行文字</p><p>这是一行文字</p><p>这是一行文字</p><p>这是一行文字</p><p>这是一行文字</p><p>这是一行文字</p><p>这是一行文字</p><p>这是一行文字</p><p>这是一行文字</p><p>这是一行文字</p><p>这是一行文字</p><p>这是一行文字</p><p>这是一行文字</p><p>这是一行文字</p><p>这是一行文字</p><p>这是一行文字</p><p>这是一行文字</p><p>这是一行文字</p><p>这是一行文字</p><p>这是一行文字</p><p>这是一行文字</p><p>这是一行文字</p><p>这是一行文字</p><p>这是一行文字</p><p>这是一行文字</p><p>这是一行文字</p><p>这是一行文字</p><p>这是一行文字</p><p>这是一行文字</p><p>这是一行文字</p><p>这是一行文字</p><p>这是一行文字</p><p>这是一行文字</p><p>这是一行文字</p><p>这是一行文字</p><p>这是一行文字</p><p>这是一行文字</p><p>这是一行文字</p><p>这是一行文字</p><p>这是一行文字</p><p>这是一行文字</p><p>这是一行文字</p><p>这是一行文字</p><p>这是一行文字</p><p>这是一行文字</p><p>这是一行文字</p><p>这是一行文字</p><p>这是一行文字</p><p>这是一行文字</p><p>这是一行文字</p><p>这是一行文字</p><p>这是一行文字</p><p>这是一行文字</p><p>这是一行文字</p><p>这是一行文字</p><p>这是一行文字</p><p>这是一行文字</p><p>这是一行文字</p><p>这是一行文字</p><p>这是一行文字</p><p>这是一行文字</p><p>这是一行文字</p><p>这是一行文字</p><p>这是一行文字</p><p>这是一行文字</p><p>这是一行文字</p><p>这是一行文字</p><p>这是一行文字</p><p>这是一行文字</p><p>这是一行文字</p><p>这是一行文字</p><p>这是一行文字</p><p>这是一行文字</p><p>这是一行文字</p><p>这是一行文字</p><p>这是一行文字</p><p>这是一行文字</p><p>这是一行文字</p><p>这是一行文字</p><p>这是一行文字</p><p>这是一行文字</p><p>这是一行文字</p><p>这是一行文字</p><p>这是一行文字</p>
  <!--[if lt IE 7]></div><![endif]-->
  <div id="popLayer" class="popLayer">
    <p>这是弹出层的内容</p>
    <button onclick="document.getElementById('popLayer').style.display='none';">关闭弹出层</button>
  </div>
</body>
</html>
用js闭包特性实现一个缓存器
闭包这个词,不知道什么时候起成了js必须掌握的知识点。分享一个实例,一个简单的缓存器。
使用场景:需要存储一些内容,但希望内容是受保险的,只存储符合一定规则的内容,通过指定的接口访问。不会被不受控的代码修改其中的值。代码如下:
window.cache = (function(){
  var _data = [];
  return {
    add: function(name, value, force) {
      if (force || !_data[name]) {
        _data[name] = value;
        return true;
      }
      return false;
    },
    get: function(name) {
      return _data[name] || false;
    },
    del: function(name) {
      try {
        delete _data[name];
      }
      catch (e) { }
      return true;
    }
  }
})();
简单说明:_data是函数的局部变量,存在于函数中的add、get、del方法在函数执之后依然可以访问到_data,这种情况被称之为闭包。数据存储在_data这个局部变量中,add get del可以访问_data进行操作,充当外界访问的接口,与外界代码隔离。可以在add中添加过淲规则,达到对数据进行过滤的目的。外界通过 add、get、del方法来操作,可以防止某些不兼容的代码直接将变量置空或删除(这种概率较低的)。
关于弹出层的两个兼容性bug
这两天修改一个弹出层,发现两个较诡异的bug。一翻折腾得出结论:不要直接在body标签中插入大段html代码。
bug1:ie6下,弹出层中的背景图片有一定机率不显示。
正常情况下:
背景图片未显示:
![]()
bug2:在世界之窗(基于chromium17的壳浏览器)中,点击调用弹出层,默认不显示。将页面滚动一下,弹出层正常显示。
bug1在经过各种折腾后,将开发的web服务器上去掉add_header Cache-Control no-cache;之后正常。bug2原来打算在显示弹出层之后,将页面的scroll的值+1。隔天因为另一个需求对js代码进行调整,原来弹出层代码段是下面这样的:
后面再校验时,上面两个bug全部消失。
用grunt自动编译sass文件并压缩
之前抽时间研究了下gruntjs,分享一下使用grunt编译sass源文件的方案。gruntjs作为nodejs的自动化工具,现在有大量可用插件可让你的工具效率提升,有兴趣的可以了解下。http://gruntjs.com/
1. 创建项目目录,进到目录。
mkdir grunt3
cd grunt3
2. 创建项目包管理文件 package.json
{
  "name": "myproject",
  "description": "我的grunt项目",
  "version": "0.1.0",
  "readmeFilename": "README.md",
  "devDependencies": {
    "grunt": "~0.4.1",
    "grunt-contrib-sass": "~0.3.0",
    "grunt-contrib-watch": "~0.4.4",
    "grunt-contrib-cssmin": "~0.6.1"
  }
}
3. 安装grunt包及需要用到的组件包
npm install -g grunt-cli
npm install grunt grunt-contrib-sass grunt-contrib-cssmin grunt-contrib-watch --save-dev
4. 创建grunt任务文件 Gruntfile.coffee
module.exports = (grunt)->
  grunt.initConfig
    pkg: grunt.file.readJSON('package.json')

    sass:
      dist:
        options:
          style: 'compact'
        files:
          'css/style.css' : 'sass/style.sass'
      dev:
        options:
          style: 'expanded'

    cssmin:
      min:
        files:
          'css/style.min.css': 'css/style.css'

    watch:
      css:
        files: ['sass/_common.sass', 'sass/style.sass']
        tasks: ['sass:dist', 'cssmin:min']


  grunt.loadNpmTasks('grunt-contrib-sass')
  grunt.loadNpmTasks('grunt-contrib-cssmin')
  grunt.loadNpmTasks('grunt-contrib-watch')

  # Default task(s)
  grunt.registerTask('default', ['sass'])

  undefined
上面的配置中,将sass文件放在sass目录下,css文件放在css目录下。style.sass中包含_common.sass文件,当两个中的一个发生修改时,重新编译style.sass文件。编译后执行cssmin压缩css文件。
5. 使用
创建css sass目录,在sass目录中创建sass源文件,终端中输入 grunt watch。修改sass源文件时,grunt会自动执行编译。
相关链接:
gruntjs: http://gruntjs.com/
grunt-contrib-watch: https://github.com/gruntjs/grunt-contrib-watch
grunt-contrib-cssmin: https://github.com/gruntjs/grunt-contrib-cssmin
grunt-contrib-sass https://github.com/gruntjs/grunt-contrib-sass
grunt插件列表: https://github.com/gruntjs
[锋利web前端开发]sass小技巧图片版本号和绝对路径引用
锋利web前端为一个系列文章,分享利用python、vimscript等语言,整合haml、sass、coffee等实现快速前端开发。
可以到 [锋利web前端开发]索引贴 查看当前系列的所有文章
本篇讲解sass中的通过变量来控制图片版本号和路径。
版本号应用场景:背景图片更新过后,浏览器缓存了之前的背景图片,用户需要强制刷新浏览器才能看到最新更新。有时候这种情形是无法接受的,通过给背景图片添加一个get参数,使浏览器重新请求图片。修改$CVS变量,重新生成css文件就可以了。
绝对路径应用场景:ie6下面的AlphaImageLoader无法使用相对路径,手动编码在开发环境迁移到产品环境时可能因为路径改变而需要手动修改多处。sass中指定一个绝对路径的变量即可,在需要时修改变量,重新生成css文件就可以轻松维护。有些项目要求全部使用绝对路径,但开发的时候硬盘本地文件都是使用相对路径引用的。在上线前将变量修改为绝对路径,迁移到线上环境。
sass代码
$CVS: '2711'
$IMGURL: '../img'
$FULLIMGURL: '/public/img'

.test
  width: 120px
  height: 40px
  background: url(#{$IMGURL}/button.png?t=#{$CVS}) 0 0 no-repeat
  .ie6 &
    background-image: none
    filter: progid:DXImageTransform.Microsoft.AlphaImageLoader(src="#{$FULLIMGURL}/img/button.png?t=#{$CVS}")
css代码
.test { width: 120px; height: 40px; background: url(../img/button.png?t=2711) 0 0 no-repeat; }
.ie6 .test { background-image: none; filter: progid:DXImageTransform.Microsoft.AlphaImageLoader(src="/public/img/img/button.png?t=2711"); }
[锋利web前端开发]sass小技巧extend和include组合运用
锋利web前端为一个系列文章,分享利用python、vimscript等语言,整合haml、sass、coffee等实现快速前端开发。
可以到 [锋利web前端开发]索引贴 查看当前系列的所有文章
本篇讲解sass中的extend和include的运用
经常能看到某些网站的css中,将多个引用到同一个背景图片的样式定义在一处。例如淘宝的这段。
.search-panel button,
.search-panel-fields s,
.search-fix,
.help-guest a,
.product-list,
.tmall-interlayer-title,
.tmall-slide-left,
a.tmall-slide-left:hover,
.tmall-slide-right,
a.tmall-slide-right:hover,
.guang-topics ol,
p.hotsale-free-sent {
   background:url(http://img03.taobaocdn.com/tps/i3/T1ZeuRXaFtXXXXXXXX-300-429.png) no-repeat;
}
以传统的css开发方式,我们需要手动将引用这个背景图片的样式名整理在一起。下面看一种以sass实现的方式:
.Cbg_btn1
  background-image: url(../img/bg_btn1.png)
  _background-image: url(../img/bg_btn1.8bit.png)

@mixin bg_btn1($top: 0, $left: 0, $rep: no-repeat)
  @extend .Cbg_btn1
  background-position: $left $top
  background-repeat: $rep

.btn1
  +bg_btn1(-50px)
.btn2
  +bg_btn1(-100px)
.btn3
  +bg_btn1(-100px)
.Cbg_btn1, .btn1, .btn2, .btn3 { background-image: url(../img/bg_btn1.png); _background-image: url(../img/bg_btn1.8bit.png); }

.btn1 { background-position: 0 -50px; background-repeat: no-repeat; }

.btn2 { background-position: 0 -100px; background-repeat: no-repeat; }

.btn3 { background-position: 0 -100px; background-repeat: no-repeat; }
如果换成以sass代码的方式实现,再转换成css代码,就可以非常方便的在当前样式中引用这个背景图片。上例中还通过定义变量设定背景图片的版本号,在下次背景图片进行修改后,只需要更新变量重新生成css文件,就可以跳过用户浏览器的缓存,让修改即立刻呈现在用户面前。