左手's Blog
我是左手,行走在路上!
ThinkPHP中关于Widget的小问题
又折腾了下Widget,纪录下遇到的两个小问题。
1. Layout中嵌入Widget,Widget未显示声明NOLAYOUT时,出现循环调用。
例:Lib/Tpl/_layout.html
<!DOCTYPE html>
<html lang="zh-cn">
<head>
  <meta charset="UTF-8">
  <title></title>
</head>
<body>
  <h1>这是layout</h1>
  <div>
    {__CONTENT__}
  </div>

  <div>
    {:W('Test')}
  </div>
</body>
</html>
Lib/Widget/Test/test.html
<ul>
  <li><a href="javascript:;">这是Widget中的内容</a></li>
  <li><a href="javascript:;">这是Widget中的内容</a></li>
  <li><a href="javascript:;">这是Widget中的内容</a></li>
  <li><a href="javascript:;">这是Widget中的内容</a></li>
  <li><a href="javascript:;">这是Widget中的内容</a></li>
</ul>
这个时候,编译出来的Widget模板大概是这样
<?php if (!defined('THINK_PATH')) exit();?><!DOCTYPE html>
<html lang="zh-cn">
<head>
  <meta charset="UTF-8">
  <title></title>
</head>
<body>
  <h1>这是layout</h1>
  <div>
    <ul>
  <li><a href="javascript:;">这是Widget中的内容</a></li>
  <li><a href="javascript:;">这是Widget中的内容</a></li>
  <li><a href="javascript:;">这是Widget中的内容</a></li>
  <li><a href="javascript:;">这是Widget中的内容</a></li>
  <li><a href="javascript:;">这是Widget中的内容</a></li>
</ul>

  </div>

  <div>
    <?php echo W('Test');?>
  </div>
</body>
</html>
Widget模板编译的时候被填充在了Layout的{__CONTENT__}中,下面W('test')的Widget调用依然存在。于是发生死循环没有报错页面一片空白,逐行调试了好久才找到问题。
解决方法:在 Lib/Widget/Test/test.html 开头添加一行{__NOLAYOUT__}
2. Widget的调用方式和传参。
我参考的是官方3.1.2的手册,手册上的示例是{:W('ShowComment')},大意是调用ShowComment得到返回的内容。在 Action 中使用 $widgetContent = W('ShowComment'); $this->assign('widgetContent',$widgetContent);但是$widgetContent的内容没有出现在模板变量{$widgetContent}出现的位置,查看函数时才看到W函数在默认情况下是echo出widget的内容。模板中正确的调法是{~W('ShowComment')},如果只是要取到Widget的内容应该使用W('ShowComment',array(),true);。
ThinkPHP用Behavior扩展Layout
ThinkPHP新版的模板引擎添加了layout试用了下layout功能还是蛮强大的,但还是用法还不太灵活需要在配置文件中手动指定。自己用Behavior做了一个小功能来扩展layout,在Action类中指定$layout属性的值即可自动启用layout,也可以在单个Action方法中设置layout的值,设置为空值时不启用layout。
1. 创建ActionEx
文件:Lib/Model/ActionEx.class.php
<?php
  class ActionEx extends Action {
    public $layout;
    public $_runViewAssist;

    // 初始化动作绑定
    public function _initialize() {
      ActionEx::action($this);
      add_tag_behavior('view_begin','ViewAssist');
    }

    // 暂存action
    static public $_action;
    // 获取action
    static function action(&$action = false) {
      if ($action) {
        self::$_action = $action;
      }
      return self::$_action;
    }

  }
?>
2. 配置自动加载路径
在Conf/config.php中添加 'APP_AUTOLOAD_PATH' => '@.Model', 将Model添加到自动加载路径。
3. 添加Behavior
Lib/Behavior/ViewAssistBehavior.class.php
<?php
  class ViewAssistBehavior extends Behavior {
    protected $options = array();

    public function run(&$params) {
      $act = ActionEx::action();
      if (!$act->_runViewAssist) {
        $act->_runViewAssist = true;
        if ($act->layout) {
          C('LAYOUT_ON', 1);
          C('LAYOUT_NAME', $act->layout);
          // var_dump($act->layout);exit;
        }
      }
    }
  }
?>
4. 测试Layout
Lib/Action/TestAction.class.php
<?php
class TestAction extends ActionEx {
public $layout = '_layout';
public function index() {
$this->display();
}
public function test2() {
// 禁用layout
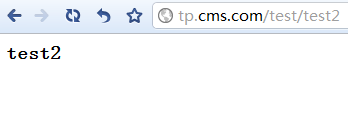
$this->layout = '';
$this->display();
}
}
?>
Tpl/_layout.html
<!DOCTYPE html>
<html lang="zh-cn">
<head>
<meta charset="UTF-8">
<title></title>
</head>
<body>
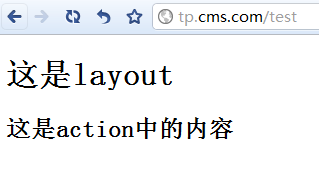
<h1>这是layout</h1>
<div>
{__CONTENT__}
</div>
</body>
</html>
Tpl/Test/index.html
<h3>这是action中的内容</h3>
Tpl/Test/test2.html
<h3>test2</h3>
分别访问localhost/Test/index和localhost/Test/test2可以看到启用layout和未启用layout界面。
附:
文件目录
| | |~Common/
| | |~Conf/
| | | `-config.php
| | |~Lang/
| | |~Lib/
| | | |~Action/
| | | | |-IndexAction.class.php
| | | | `-TestAction.class.php
| | | |~Behavior/
| | | | `-ViewAssistBehavior.class.php
| | | |~Model/
| | | | `-ActionEx.class.php
| | | `~Widget/
| | |+Runtime/
| | |~Tpl/
| | | |~Test/
| | | | |-index.html
| | | | `-test2.html
| | | `-_layout.html
| | `-index.php
启用Layout和禁用Layout的截图
相关链接
ThinkPHP官网:http://www.thinkphp.cn/
LNMP环境创建ThinkPHP项目
看到ThinkPHP发布了3.1.3版本,下载了一个创建项目玩玩。中间还遇到些小问题,记录一下。
1.下载解压缩TP
unzip ThinkPHP3.1.3_Full.zip -d /www/lib/
2.创建项目文件
cd /www/cms/tp
vim index.php
<?php
  define('APP_DEBUG', 1);
  require '../../lib/ThinkPHP/ThinkPHP.php';
3.修改权限
chmod 775 . -R
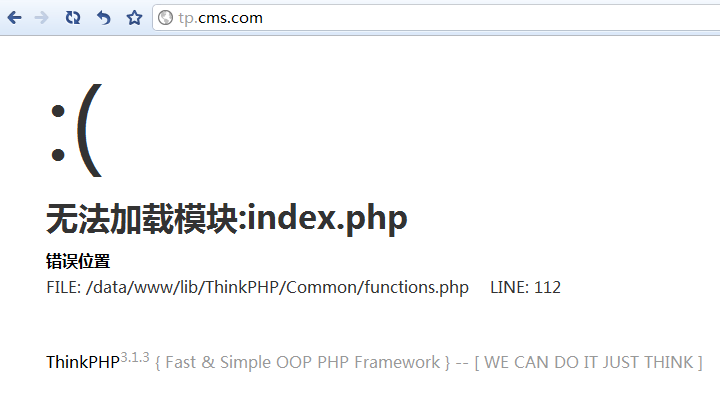
4.浏览器访问,基本上会出现如下错误
无法加载模块:index.php
错误位置
FILE: /data/www/lib/ThinkPHP/Common/functions.php LINE: 112
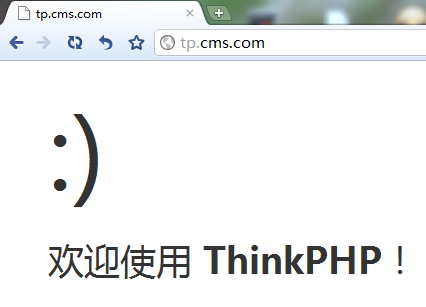
5.编辑配置文件
vim Conf/config.php
<?php
return array(
  //'配置项'=>'配置值'
  'URL_HTML_SUFFIX' => '',
  'URL_CASE_INSENSITIVE' => 1,
);
?>
至此大功告成
附本人nginx host配置
# tp.cms.com
server {
    listen       80;
    root /www/cms/tp;
    index  index.html index.htm index.php index-dev.php;
    server_name  .tp.cms.com;

    location ~* \.php {
      fastcgi_pass 127.0.0.1:9000;
      #fastcgi_pass unix:/tmp/nginx_sockets_php5-fpm.sock;
      fastcgi_index index.php;
      include fastcgi.conf;
      set $path_info "";
      set $real_script_name $fastcgi_script_name;
      if ($fastcgi_script_name ~ "^(.+?\.php)(/.+)$") {
        set $real_script_name $1;
        set $path_info $2;
      }
      fastcgi_param PATH_INFO $path_info;
      fastcgi_param SCRIPT_NAME $real_script_name;
      fastcgi_param SCRIPT_FILENAME $document_root$fastcgi_script_name;
    }

    if (!-e $request_filename) {
      rewrite  ^(.*)$  /index.php$1 break;
    }
}
更新记录:
2015-12-28:修改nginx配置的错误
linux web服务器iptables设置
iptables -P INPUT ACCEPT
iptables -P OUTPUT ACCEPT
iptables -P FORWARD ACCEPT
# 先把所有规则打开,则否ssh可能直接断掉

iptables -F
iptables -X
# 清除已有规则

iptables -A INPUT -p tcp --dport 22 -j ACCEPT
# 先把ssh端口加上

iptables -P INPUT DROP
iptables -P FORWARD DROP
# 设置INPUT和FORWARD为封锁

iptables -A INPUT -i lo -j ACCEPT
# 开启本地环路,使得ping 127.0.0.1这样的包以通过。php-fpm的http://127.0.0.1:9000可以使用
iptables -A INPUT -p icmp -j ACCEPT
# 允许其它机器ping这台服务器
iptables -A INPUT -m state --state ESTABLISHED,RELATED -j ACCEPT
# 允许自己发送包的返回通信,不开启这个,机器上面使用ping www.google.com这样的无法拼通

iptables -A INPUT -p tcp --dport 80 -j ACCEPT
# 开放web端口

/etc/init.d/iptables save
# 保存设置
/etc/init.d/iptables restart
# 重启iptables
[Fedora开发环境搭建]搭建LNMP开发环境
Fedora17上能找到的PHP最低版本为5.4.x。因公司项目开发较早,仅能在上5.3.x上面正常运行,所以php采用编译方式安装,nginx、mysql使用源来安装。
1.安装nginx、mysql并设置自动启
2.安装基础库
3.下载源代码包
wget http://ftp.gnu.org/pub/gnu/libiconv/libiconv-1.14.tar.gz
4.编译
#建立软链接
#编译
#复制配置文件
#配置php-fpm
sudo vim /usr/local/php/etc/php-fpm.conf
cd /usr/local/srctar -zxvf APC-3.1.9.tgzcd APC-3.1.9/usr/local/php/bin/phpize./configure --enable-apc --enable-apc-mmap --with-php-config=/usr/local/php/bin/php-configmakemake install添加apc扩展
sudo mkdir /usr/local/php/etc/conf.d
参考链接:http://solf.me/compile-nginx-php-mysql-on-centos-lnmp/